
| Previous Top Next |
| Changing the Orientation of the Projectile, ADVANCED |
To have more control over the projectile's orientation, it is necessary to turn on the viewing window's toolbar. This has many options. The first section below will cover the options that you will use 90% of the time. This will be followed by the full explaination of all of the options.
The 90% solution will include rotating the projectile in any plane and also bringing the viewing window closer to or further away from the projectile
 . It may already be selected


| © 2002 Arrow Tech Associates |
Cortona User's GuideThe following sections contain the description of the Cortona main controls:The Cortona WindowWith Cortona you can see and explore 3D worlds. Cortona will start automatically when you open a file containing VRML world. There are two parts of the Cortona window:
Some worlds do not allow you navigating in a world, so toolbars may be invisible. Navigating in CortonaMoving through a 3D Space is similar to moving a camera. Think of a video camera that captures images in the real world and converts them into electronic signals for viewing on a screen; it has a position and orientation, and these are independent attributes.Your movements in the world continually position and orient that camera. Use the camera controls on the vertical toolbar to move the camera through the 3D Space.This concept assumes that there is a real person viewing and interacting with the VRML world. Nevertheles, the VRML author may place any number of viewpoints (or cameras) in the world - interesting places from which the user might wish to view the world. Only one viewpoint may be active at a time. This section describes the mechanisms that Cortona provides for navigating in a three-dimensional space. Using ViewpointsA viewpoint describes a position and orientation for viewing the scene.
The VRML author will probably want to guide the user to the best vantage
points for viewing it. Not all worlds contain viewpoints, but when they
do, you can use them.
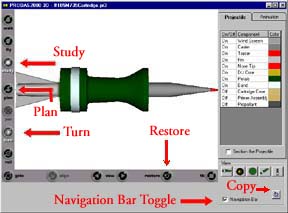
If there are no predefined viewpoints in a world, the Empty message appears. Moving around: Walk, Fly, and StudyThere are three main navigation modes that Cortona offers: WALK, FLY, and STUDY. You can switch the navigation mode by clicking buttons on the vertical toolbar. Each navigation mode may have several options: PLAN, PAN, TURN, and ROLL. The combination of navigation mode and its option determines the possible camera motion and its orientation. Please note that the VRML author has an opportunity to specify which navigation paradigm should be used in the scene by default. Some worlds don't allow the user to use navigation controls, but they may provide on-screen cues to navigation. You can navigate with the mouse, the keyboard, or both mouse and keyboard. To move around a 3D world using the mouse:
Note: The distance that you drag the mouse determines the speed with which the camera moves. If you stop moving the mouse, the camera will continue moving until you release the mouse button. To accelerate the camera's movement or rotation, press SHIFT, CTRL or SHIFT+CTRL. Use WALK+PLAN to move in a horizontal plane. Forward - move closer Backward - move further Right - turn to the right Left - turn to the left Note: Move the mouse forward or backward while holding down the Space key to turn upward, downward. Move the mouse left or right while holding down the ALT key to move left or right. Use WALK+PAN to move left or right in a horizontal plane. Forward - move closer Backward - move further Right - move right Left - move left Note: When you move the camera right or left, the world will appear to move in the opposite direction. Use WALK+TURN to change the angle of the camera in a world. Forward - turn upward Backward - turn downward Right - turn to the right Left - turn to the left Use FLY+PLAN to move left or right. Forward - move the camera forward towards its longitudinal axis Backward - move the camera backward Right - turn the camera to the right around its vertical axis Left - turn the camera to the left around its vertical axis Note: The camera's vertical axis may be inclined in a 3D Space. Move the mouse while holding down the ALT key to switch FLY+PAN. Move the mouse while holding down the Space key to switch FLY+TURN. Move the mouse while holding down the ALT+Space keys to switch FLY+ROLL. Use FLY+PAN to move up, down, left, or right within a single vertical plane. Forward - move up Backward - move down Right - move right Left - move left Note: When you move the camera, the world will appear to move in the opposite direction. Use FLY+TURN to turn the camera. Forward - turn the camera upward around its horizontal axis Backward - turn the camera downward around its horizontal axis Right - turn the camera to the right around its vertical axis Left - turn the camera to the left around its vertical axis Use FLY+ROLL to incline the camera. Right - incline to the left Left - incline to the right Use STUDY+PLAN to examine an object from various angles. Forward - move the camera forward Backward - move the camera backward Right, Left - move the camera around the point which is defined by the pointer position where you press the left mouse button. If there is no any face there, the scene coordinate origin is considered. Use STUDY+TURN to examine an object from various angles. Select STUDY and TURN from the vertical toolbar. Position the pointer over the object you'd like to examine. Press the left mouse button. Drag the mouse to move the camera around the point on the object where you press the button. Note: Move the mouse while holding down the ALT key to switch STUDY+ROLL. Move the mouse while holding down the Space key to switch STUDY+PLAN. Move the mouse while holding down the ALT+Space keys to switch STUDY+PAN. Use STUDY+ROLL to incline the camera around the selected point. Select STUDY and Roll from the vertical toolbar. Position the pointer over the object. Press the left mouse button. Drag the mouse to incline the camera around the point on the object where you press the button. Right - incline to the left Left - incline to the right Use GOTO to move close to object in a world. Select GOTO in the toolbar and then click on an object in the world. You'll move directly to it. Restore, Fit, and AlignCortona provides three mechanisms that can help to re-orient a camera if you have lost your way in a world. Unlike the navigation tools, these buttons invoke predefined actions that take place as you click on them.
Using Keyboard for NavigatingYou can control the camera using keyboard commands. The functionality for arrow buttons corresponds to the movement of your mouse and depends on the navigation type and its option. Please note that the following description of keyboard commands is presented for the FLY+PLAN navigation.
To accelerate the camera's movement or rotation: Press SHIFT, CTRL or SHIFT+CTRL and one of the above keys simultaneously. The ALT and SPACE keys allow the user to quickly change the navigation option to PAN and TURN accordingly in the FLY navigation mode (to ROLL and PLAN in the STUDY mode). The ALT and SPACE keys simultaneously pressed activate ROLL in the FLY navigation mode or PAN in STUDY.
Setting Cortona OptionsThe following options are supported from the pop-up menu of 3D window:
To set Cortona preferences, choose Preferences... from the right-button pop-up menu. The ParallelGraphics Cortona Control dialog box is displayed. Renderer Allows you to select a rendering mode. To draw the 3D image, Cortona provides two hardware renderers: OpenGL and DirectX. If your system has hardware acceleration for either OpenGL or Direct3D (note: you must have DirectX 5 or greater installed), choose the appropriate renderer. Using hardware renderers can introduce limitations. Select a renderer to compare the performance and visual quality of hardware versus software rendering and set your preferences accordingly. Renderer options
Collision detection. By default, Cortona will allow you to pass through objects in your path. To prevent from passing through objects, click Always in the Collision detection box at the Navigation tab. Background color. You can change a background color of Cortona 3D window: Click the Background color box at the General tab, click the desired color from the palette, and then click OK. VRML authors can also control a color that simulates ground and sky. |