
The following code is related to opening the projectile: Note that this is object oriented code. The projectile is set to the PROJ object.
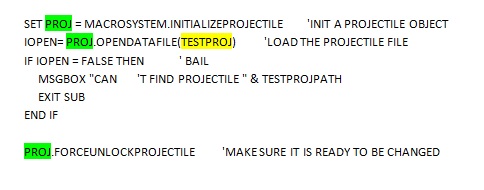
The above code does the following:
- The first two lines are needed to open our projectile. Remember that TESTPROJ is the
full filename of the Projectile .PR3 file that was set up in the previous slide. Technically these
are the only two lines required to open the projectile.
- The next 4 lines are error checking. If the projectile failed to open then:
- A message box pops up to let the user know.
- The script is exited once the user acknowledges the message box.
- The last line in the screen capture above assures that the model can be edited.
Later in the script the model will be changed. Even though we are modifying the model
we are not saving our changes so forcing the model to be unlocked is not a risk. Locked models
can not be changed. This line makes sure that we are working with an unlocked model.
Previous
Top
Next